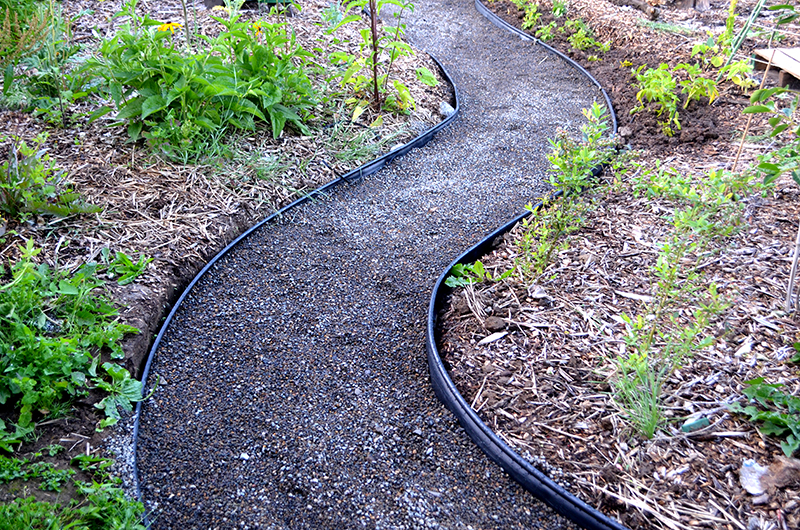
Crushed rock pathways curving through our garden
Over my years of homesteading, I have experimented with many different materials for pathways: wood chips, straw, leaves, various rock. None of those materials made good, long-term pathways. Although cheap to acquire, the soft organic material – wood chips, straw, leaves – will always become an ideal place for weeds. Round rock, like pea gravel and river rock, will shift under foot making it difficult to walk on and weeds eventually find their way into the small gaps between rocks.
It’s been a combination of experience and education that informed what my options should be in this garden, and any client’s garden, when it comes to pathway materials. A masters degree in landscape architecture and years of working as a landscape designer have now honed my list to include the following major options: crushed rock, pavers, natural stone (like flagstone), architectural pavers. That list also reflects the cost range from cheapest (crushed rock) to most expensive (architectural pavers).
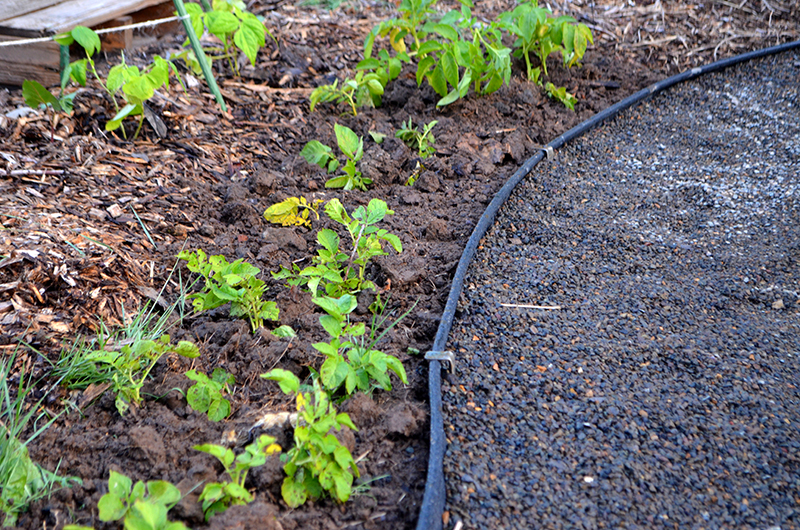
Hardscaping clearly separates planting space from walking space. Pictured here: trench of potatoes growing adjacent to our new paths
Initially I wanted architectural pavers, which look super modern and sleek. The material alone was going to set us back $5,000+, plus the added costs for installation. That was cost prohibitive for our budget. Instead, I decided the pathways would not be a big, standout feature of the garden. I choose crushed rock for it’s visual simplicity and low cost.
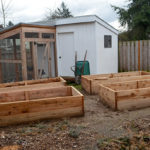
The pathways were dug out to about 6″ in depth, then 4″ of compacted quarter minus gravel were poured in. The hard edges of the gravel compact nicely for a walking path and the “fines” (sand) fill in holes to make a strong foundation with no space for weeds to grow. We could have filled the whole thing with gravel, but it’s not the prettiest material to look at.
I choose to top the gravel with 2″ of quarter ten crushed rock. Quarter ten is a smaller rock (about the size of pea gravel) with hard edges, so it still compacts nicely for walking. It has no “fines” giving it a cleaner finished look.
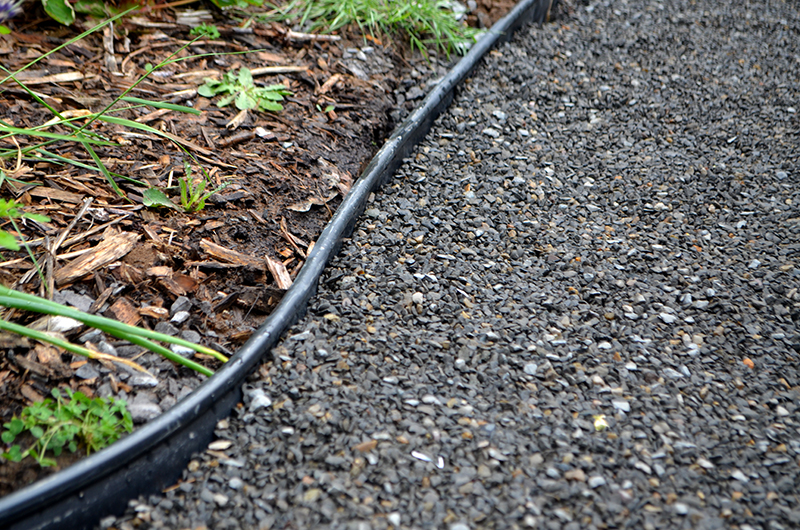
Black plastic snap edging will help separate path from planting beds
We used the run-of-the-mill black plastic snap edges on either side of the pathways. I like that feature the least, but it our budget wasn’t huge so it fit the bill. Typically I always have an edger installed. It keeps the pathways snugly in place so they don’t spread out over time and it adds to the neat appearance. A better option would be 1/4″ steel, which will rust in place taking on a lovely patina. That would have added another $500+ to the project.
I am over the moon with the final install! I spent about $13 per linear foot for 30″ wide paths (wide enough for a wheelbarrow), which includes both materials and install. I wasn’t planning to haul rock and bust clay soil in my third trimester 
The pathways are simple enough to make a nice backdrop to the more important garden features, like the raised beds, Juniper’s teepee, and eventually our lush edible plantings. They make the garden look tidy and organized, even if there are still tons of weeds out in the planting beds. And I love that they clearly define the various spaces within our garden, from the vegetable beds to Juniper’s play area and the perennial edible areas.
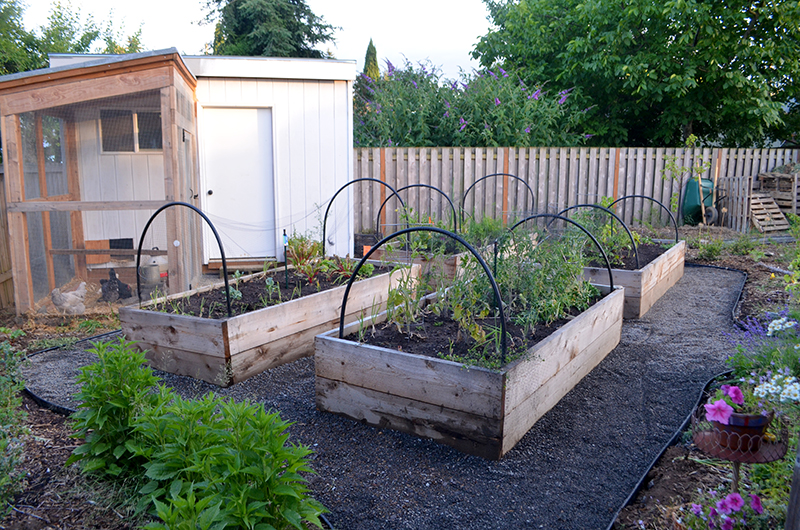
Crushed rock paths creating a neat and tidy appearance in our garden
Best of all, maintenance will be minimal over the years because this was installed the right way. That means more time harvesting and enjoying the garden, and less time pulling weeds! I would love to hear about your garden paths, whether it’s a lesson learned or a favorite material. Tell me about it in the comments below!
 Upgrade your hanging basket game!
  Here’s

 This cluster was about the siz


 I start with a


Your yard looks great!! I want to do paths like you have, but I would like
to use steel for a border. I’ve never seen it in the stores, is that
something only a contractor would be able to get and install?
Kaity, you will need to search out a local steel supplier. In Portland, this is where I would call first: http://www.standardsteelnw.com/products/ You can ask if they deliver, otherwise you need a a long truck since they come in 20′ lengths.
Hi,
I got some pathways installed that included 1/4 minus gravel and I am having a hard time with keeping it clean. I’m curious. How solid of surface is yours? Like is it loose on top or do you have to rake it? The installer compacted the paths but they have become a mess.
The base of our pathways is 1/4 minus, which creates a solid base material. It’s not that pretty, so we topped ours with 2-3″ clean quarter ten. It’s a finer rock texture and does not include the “minus”, which is very fine-grained material (sand) intended to fill the cracks between rocks to make a compacted, strong base. The quarter ten is just there to be pretty and look uniform.
Crushed rock paths need to be kept free from organic debris. We do that by racking and using a leaf blower gently, so we don’t have rocks flying around Hopefully they helps you.
I think this looks lovely! I want to do this path in my old deep shaded backyard!
Does it need to be so deep?
I have lots of tree roots.
Definitely looks like the path plan to fit my budget and yard.
A couple thoughts. Ideal depth is really 4″ compacted gravel, then topped with 2-3″ clean quarter ten crushed rock. That’s ideal for both weed suppression and drainage. If you need to go thinner AND there are lots of overhead trees (you mentioned shade) you might consider stepping stones thru mulch instead. If you don’t keep the crushed rock clear of debris, things like leaves will decompose and create soil pockets over time, which will lead to weeds.
I’m looking for a solution to MOLES messing up my garden paths. I have shredded bark between raised beds, and they make a mess of it. I would like a stone path, but won’t the moles still mess it up be pushing dirt up through the rock? Do you have moles where you live & have they been a problem in the paths? Thanks Wendy
Moles can push up on crushed rock paths. Maybe not as easily if you have 4″ of compacted gravel, then top them with 3″ of nice clean rock.
Thank you for sharing this wonderful method! How do you think it would behave on a slope?
It depends on how steep the slope is, but I suspect it will shift downhill over time. So you’d probably need a good thick base layer of compacted gravel, and then plan to refresh with the topped clean quarter ten rock every few years as needed.
Thanks for this idea! I was originally considering DG for pathways and for an area where we want a firepit, but I keep hearing it gets messy, muddy, tracks all over and you have to maintain it constantly (especially after rains). So you would suggest 1/4″ quarter minus crush gravel or rock as a “base layer” then? Would you suggest the same for if I wanted an adjacent area of flagstone next to a crushed rock path like yours? I also want to have an area of flagstone pavers next to our concrete patio area, and then would consider a crush rock path on the other side of the flagstone paver area. Would you suggest excavating out 4-6″ and filling it all with the 1/4″ quarter minus gravel or rock (does it matter if it’s gravel vs rock btw?) as a common base layer for both the flagstones and the path next to it?
DG in the Portland area is not a material I recommend for the reasons you mentioned – it gets mucky in our wet climate and the rain even simply washes it away. The base layer for pathways should be 1/4 minus, so it’s firm + suppresses weeds. I recommend topping this base layer with quarter ten “clean”. This rock size is smaller than 1/4″, so it gives a nice, clean, uniform look. Because it is “clean”, it does not include that sandy material so it will look, well, “clean” and not like a construction yard
For your next question, typically 1/4 minus is the base layer under most hardscape, including pavers and flagstone. You will want to research that to confirm. It also sounds like you might have multiple hardscape materials onsite: crushed rock paths, concrete, flagstone. I typically recommend one material for your “primary” spaces and a second material for your “secondary” spaces. For example, primary patio and primary pathways (like the entrance to your house) might all be flagstone. Secondary spaces might be an informal fire pit in the corner of the garden and your garden/secondary pathways. Those could all be crushed rock (the 1/4 minus base with clean quarter ten on top). Good luck on your project!
Thanks! I am having a tough time finding local supply yards that actually have “quarter minus” and “quarter ten” – it seems like that might sort of be a local term to your area? I honestly don’t know what sizes these would translate to here. The common theme seems to be DG track fines and larger 3/8 DG. There is talk of “crushed rock” but generally I think it’s intended for loose rock paths? When I call a lot of these places, I don’t think most of them know what “quarter minus” or “quarter ten” even is, so I’ll have to look into that more to figure out what that translates to down this way
FYI: looks like this place carries 1/4″-minus but not sure if it’s exactly the same as what you used? https://www.earthstonerock.com/1-4-Gravel-Wholesale-prices-for-sale-near-me-s/979.htm
Class II Roadbase is probably the next most common and possibly closest thing to that for baselayers. As far as the top, I’m still having trouble finding anything that closely resembles 1/4″-ten… maybe this 1/4″-screened (to which should remove most if not all of the fines)? https://www.earthstonerock.com/Arizona-Blonde-Decomposed-Granite-for-sale-p/dg302x025.htm – the only issue is the limited color option
Sorry for all the comments! Just stumbled across this, which sounds interesting and seems like it potentially could work as well for the top layer:
https://www.earthstonerock.com/Bulk-prices-Black-Basalt-Chip-Sample-near-me-p/gvl116051bbax25sxsmpl.htm
Jeremy, if you are in California then your drier climate might not have the soggy, mucky issues that mine has with DG. I’m in the Pacific NW where it rains all the time, so that Quarter Ten-clean product keeps pathways well-drained. Because it’s “clean” it does not have the sandy particles mixed into it, so water can drain right through. The base layer here is most commonly 1/4″ minus. The “minus” means it does have those sandy particles, which is needed so it can compact very tightly and also prevent weeds.
When you’re talking to your local rock suppliers, I would tell them you need a subbase that will compact snugly and supress weeds. It’s going be the most common material contractors use for a base under pathways and patios, so the rock yard will be your expert on which specific product if it’s not common to use 1/4 minus in your area. As you explain to them what you want for those top 2-3″, you’re looking for a small rock size that doesn’t have fine particles, so it looks clean and uniform.
Again, if you’re in CA and they are telling you to just go with DG, I would take their advice. My pathways work great for my climate, but CA is very different. Good luck to you!
Hi there, I came across your article win, researching decompose granite and otherHardscape Materials. I am in California and people are recommending DG but the color doesn’t fit our liking. What you have seems to fall along the look we are going for. With two kids in college we are also trying to be very mindful with our budget. Our main goal is to create a walkway that doesn’t bring particles into the house/is messy/mud etc. Do you find that you have pieces of crushed rock on the bottom of your feet coming into your house all the time leaving the area of the path? Want it to be compacted to where it wouldn’t leave the area. I really appreciate your time. Thank you so much. Sarah
Because it is loose material, it will shift underfoot. I have one pair of boots in particular that sometimes hold onto a few rocks in between the grooves of the chunky sole. We have a concrete patio that catches any shifting rock before it ends up in the house. You might consider stepping stones instead. If you want a pathway that stays fixed, you would need to look at a more expensive option: pavers, flagstone, concrete.
Thank you so much for your reply. We do have a large paver patio in between which would catch any fall off from little rocks from the pathway. I was told DG would have the same issues. But overall, if it’s compacted well it should stay relatively in place for leaf blower, etc. main concern would be dogs running on it. They have their crazy runs every once in a while we own two dogs/goldens. I appreciate your time. Your pathway looks beautiful and it’s one of my inspiration pictures on my Pinterest page. I will resort back to this when I go to the material yard today.