Hip Chick Digs

Adventures of an urban homesteader growing greens, preserving the harvest and tending a backyard barnyard

 Facebook Twitter LinkedIn Instagram Pinterest
  • Home
  • About
  • Blog
  • Homestead Tour
    • Current Homestead
    • Original Homestead
  • Landscape Design
  • Book
  • Archives

November 22, 2019 by: Renee Wilkinson

Perfect Pumpkin Puree

Share
Share on Google Plus
Share
Share on Facebook
Share
Share this
Pin
Pin this

You can easily substitute fresh pumpkin for canned pumpkin, but a couple extra steps are needed to ensure the final product is perfect. Follow these steps to ensure you end up with a perfectly roasted pumpkin that is superior in both flavor and texture.

Homegrown Rogue Vif d’Etampes pumpkin with a decorative pumpkin resting on top

Selecting the Right Pumpkin

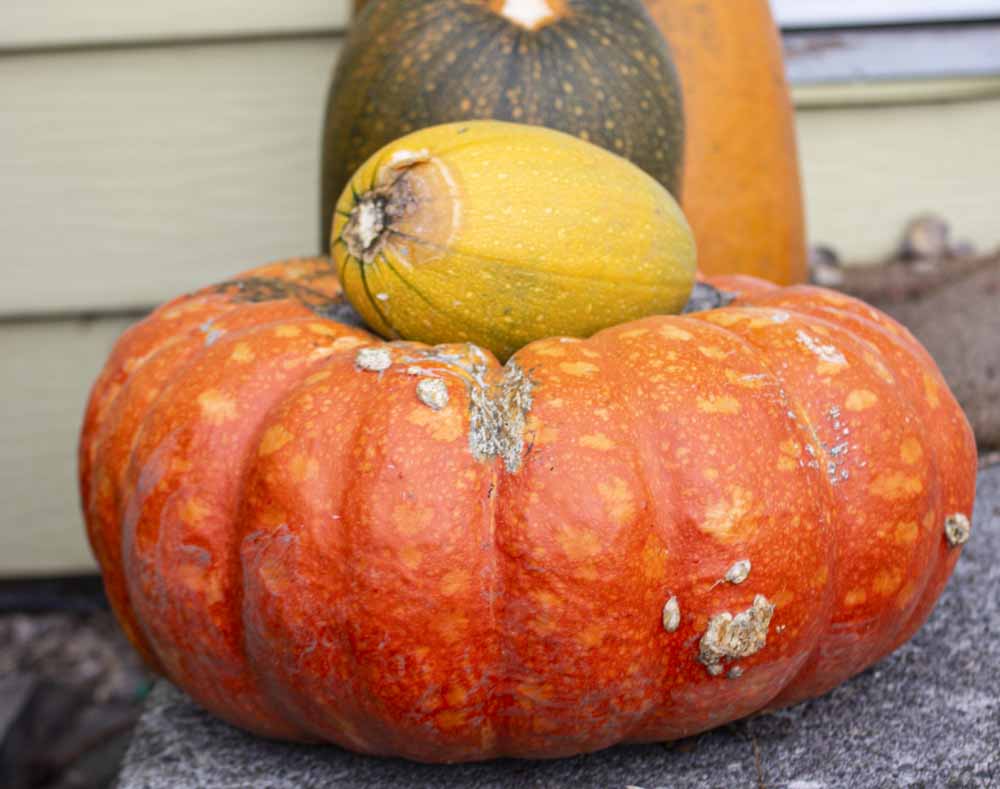
Your journey to the perfect pumpkin puree begins with choosing the right variety of pumpkin. Those big pumpkins we carve for Halloween have flesh that is watery and stringy, so leave those for just decoration.

For cooking and baking, choose pumpkin varieties with dense, sweet flesh. This includes Sugar Pumpkins, Long Island Cheese, anything with the word “Pie” in the name, Fairytale, and Rogue Vif d’Etampes (my favorite). More and more of these varieties can be found at the grocery store and farmers markets, but nothing beats growing your own.

Roasting Pumpkin + Making Puree

You’ve chosen the perfect pumpkin – now let’s roast it! Roasting pumpkin is easy, but takes a little time. Do it ahead of time, set aside what you plan to use that week, and freeze the rest. You’ll have delicious pumpkin puree anytime you need it.

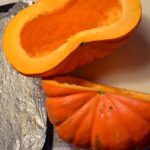
  1. Preheat the oven to 375 degrees. Wash the exterior of the pumpkin, then slice it in half from top to bottom. Scoop out the seeds – mine go to the chickens, but you might want to save some to roast later.
  2. Brush a couple tablespoons of olive oil* over interior of the pumpkin. Place it cut side down on a baking sheet. Roast for 45 minutes, then check every 5 minutes to test for doneness. It should pierce easily with a fork. (Bigger pumpkins might take closer to an hour)
  3. Once tender, remove from the oven and let cool until you can safely handle it. Separate the shell from the flesh by either peeling off by hand or scooping out with a large spoon.
  4. Puree the roasted pumpkin flesh with an immersion blender (my preferred method), food processor, blender, or potato masher to your preferred consistency.

*Note: if olive oil is not your thing, you can use grapeseed, canola, vegetable oil. You can omit the oil altogether – the cut sides that touch the pan might just stick/char a little. Discard those areas prior to roasting so you don’t impart a burnt flavor into your puree.

The secret to perfect pumpkin puree: drain the puree with cheesecloth

Perfect Pumpkin Puree (Optional Step)

Many excellent cooks will claim that canned pumpkin is still superior to fresh. Their main argument is that 1) you can’t taste the difference and 2) fresh pumpkin puree is still too watery. If you take the time to drain your freshly roasted pumpkin puree, it will intensify the pumpkin flavor and result in a creamier texture.

Simply line a colander with cheesecloth, set it in the sink, and pour in the puree. Let the pumpkin puree sit anywhere from four hours to overnight.

The final result will be thick, creamy puree you can easily mound up on a spoon – similar in texture to tomato paste. The flavor is intensified because so much excess water has been purged, so you are left with more pure pumpkin deliciousness.

*Draining the pumpkin puree is optional, for those cooks who want the most perfect, persnickety puree. I’ve skipped this step for over a decade and still had great baking/cooking results using homemade puree. But for you perfectionists, give it a shot and tell me what you think.

Frozen pumpkin puree “pucks”

Freeze Your Pumpkin Puree

Refrigerate what you plan to use in the next few days, then freeze the rest. To freeze, fill muffin tins with pumpkin puree. Place the whole muffin tin in the freezer overnight.

After firmly frozen, pop out each “pumpkin puck” and place in the labeled freezer bag for long-term storage. If they are difficult to get out, let them sit for five minutes to slightly thaw around the edges. You could also use a butter knife to carefully loosen.

Keep using that frozen pumpkin puree until it runs out or you can replace it next fall – whatever comes first. Someone out there will tell you it’s probably best within six months – there might be a slight decrease in quality the longer it’s frozen. But we all know homegrown pumpkins are only ready for harvest once a year: in the fall. So forget about that and just enjoy homemade pumpkin puree, harvested at its peak flavor, all year long.

Perfect homegrown (HG) pumpkin puree ready for the deep freeze

Related Posts

  • Homemade Pumpkin PureeHomemade Pumpkin Puree
  • Winter Harvesting
  • Harvesting JanuaryHarvesting January
  • Apricot-Rosemary PreservesApricot-Rosemary Preserves
Homesteading with Kids
2020 Vegetable Garden Plan

Leave a Reply

Your email address will not be published. Required fields are marked *


Instagram

Most days on the homestead aren’t big or dramati Most days on the homestead aren’t big or dramatic—they’re made of small, steady moments.

Refilling the chicken feeder. Collecting eggs still warm from the nest. Pulling up a few carrots. Tossing weeds to the flock. Trimming back the roses before they take over.

It’s not about doing it all—it’s about doing what you can, when you can.
Modern homesteading is less about perfection and more about rhythm. A little work, a little joy, and a lot of dirt under your nails.

Homesteading looks different for everyone—what does it look like (or feel like) for you?

#hipchickdigs #modernhomesteading #dayinthelife #backyardchickens #gardeninglife #homesteadrhythms #growyourown
Swarm catching 🐝 This cluster was about the siz Swarm catching 🐝 This cluster was about the size of a basketball hanging in a Doug Fir next to a playground. They were super easy to catch with my extension pole! 

Note: don't put a swarm in anything plastic. I hated putting them in this bucket, but it's all I could grab in time. But they can easily overheat in something like this, which lacks good ventilation. I relocated them into a wooden hive super quick, but I was so nervous every minute they were in here.

As always, I chatted with several onlookers. Folks are always so curious about swarms and honeybees. It's a lovely way to educate and build bee ambassadors 🐝 
.
.
.
#urbanbeekeeping #swarm #beeswarm #swarmseason #womeninbeekeeping #beekeeperslife
Weekend vibes: gardening in pajamas, coffee in han Weekend vibes: gardening in pajamas, coffee in hand, and dirt under my nails before 9am.
This is how I fit homesteading into modern family life—little pockets of peace squeezed between breakfast and soccer games.

It’s not picture-perfect, but it’s real—and it feeds my soul (and my soil). Here’s to slow starts, messy mornings, and growing what we can, when we can.

How do you squeeze in garden time during busy weeks? Pajamas optional—tips welcome.

#hipchickdigs #weekendgardening #momlifeinthegarden #homesteadinglife #gardeninginreallife #slowmorningvibes #growyourown
Hey there, new friends! I’m Renee, a modern home Hey there, new friends! I’m Renee, a modern homesteader living in Portland, Oregon—raising chickens, veggies, and three awesome kids on our little slice of urban heaven.

I'm carrying on generations of knowledge to grow my own food, live more sustainably, and teach my family the value of getting our hands dirty (in the best way). Here, I share the real ups and downs of homesteading—think garden wins, chicken shenanigans, DIY projects, and everyday lessons from the land.

Fun fact: I'm a tango dancer and a landscape architect. Both are useful in the garden 💃🏽 

I’d love to get to know you—drop a comment and tell me where you’re from and what you’re growing (plants, dreams, chickens… anything counts)!

#homesteadlife #urbanhomestead #gardentok #backyardfarm #intro
Homegrown asparagus tastes 1,000% better than anyt Homegrown asparagus tastes 1,000% better than anything from the store. So juicy, crisp, naturally sweet. Some of these were 18" long and still tender. 

Asparagus is a perennial vegetable, meaning you plant once and it comes back every year. You have to wait until year three to start harvesting, but it's worth that wait. 

I do nothing to care for it, but every year I have arms full throughout spring and early summer. I planted an 8' row along an otherwise boring fence. The foliage turns brilliant gold in the fall. Tell me if you grow this crop! 
.
.
.
#modernhomestead #pdxgarden #urbanhomestead #urbanfoodforest #foodscape #foodforest #asparagus #growingasparagus #springgarden #springharvest
More garden arches! This one also started with 20' More garden arches! This one also started with 20' lengths of thin rebar, shoved into the ground with my weight and hooped over loosely. Our old Christmas tree trunks are tied to the rebar, to thicken up the base. 

Pruned branches from our fig tree make good vertical supports. Multi-stemmed branches help build up the sides, bc they can also be woven in horizontally.

The most time is spent weaving in thin, flexible branches horizontally from our plum trees. The structure gets more secure pretty quickly, as tension is built up.

I use twine only selectively. Most is just held in place with just tension alone. It won't last forever, but it's not meant to. I'll rebuild in about 3-4 years as branches need replacing.
.
.
.
#modernhomestead #pdxgarden #urbanhomestead #foodscape #gardenart #gardenarch #timebasedart
Making woven garden arches 💪🏼 I start with a Making woven garden arches 💪🏼 I start with a few 20' lengths of thin rebar. My soil is soft at this time of year, so I can use my body weight to push them deep into the ground. 

Then I start layering in pruned fruit tree branches. Fig and pear work well as vertical sides. Plum and apple are flexible enough for me to weave in between. Multi-stemmed pieces are helpful to create tangles of branches. I use twine selectively, if at all. 

I dream of hopping across the pond to take a workshop at @damsonfarm.house to improve my technique making natural supports. Some day, I hope! 
.
.
.
#modernhomestead #pdxgarden #urbanhomestead #foodscape #gardenart #gardenarch #timebasedart
I couldn't bring myself to send these cushions to I couldn't bring myself to send these cushions to a landfill, even though the fabric covers were totally deteriorating. But I've never seen cushion covers for sale, until I stumbled upon these at Ikea.

They fit perfectly! I don't need fancy patio furniture - just a place to put my feet up. So hurray for the small wins and keeping these babies out of the landfill 🎉
.
.
.
#modernhomestead #patiofurniture #patiogoals #upcycle
Taking care of yourself can be a form of resistanc Taking care of yourself can be a form of resistance. Rest, nourish your body, tend your garden. Keep your tank full 💪🏼 
.
.
.
#modernhomestead #pdxgarden #urbanhomestead #urbanfoodforest #urbanfarming #foodscape
Follow on Instagram

RECENT PINS

HOUZZ

Hip Chick Digs Landscape Design Featured on Houzz

© 2025 · Fun Genesis WordPress Theme by, Pretty Darn Cute Design