The mural in Juniper’s room at our old house
A big feature of her old room was the beautiful mural I painted for her. I was open to something new though in this house, so I sketched up a few options for her and let her pick. She chose the same one that was in her old room.
It can seem intimidating at first to boldly lay a paintbrush on the wall to freehand a mural, but there are ways to boost your confidence. The first step in that direction was the sketches I did. It helped Juniper decide on the design she wanted, but it also helped me decide the shape and quantity of the trees to paint.
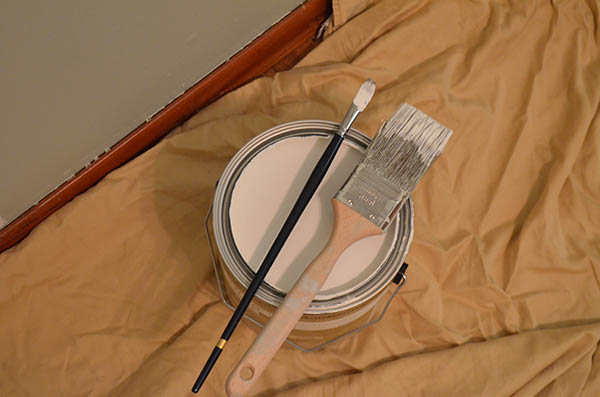
I used a 2″ painting brush plus a nice, thin artist brush
I used a 2″ painting brush and a nicer, thin brush to create the mural. I began by painting thin lines for each trunk to get the spacing right on the wall, using my earlier sketch as a guide.

After thin trunks were drawn to determine spacing, the trees start to “grow”
After the early trunks were done, each tree began to “grow” on her wall. As one got halfway up the wall, I stopped and worked on the next one. Little by little, working back and forth between the four trees, they took on a unique central trunk up to the ceiling. If one ended up leaning too far in one direction, I could balance it out with the tree next to it.
With the same method, I began adding side branches. I imagined these were aspen trees, growing close together with upward branches. I wanted each one to seem organic, so I tried to avoid too much symmetry and included lots of crooked branches.

Skeletons for the trees are drawn – trunks and branches. It’s now time to start thickening them.
It’s important to take a step back often. After a couple branches were painted, I stood back to see how it looked. After maybe 30 minutes of working, I took a water break to leave the room. When I came back, my eyes were fresh to evaluate how things were progressing.
When I had essentially a skeleton for each tree, it was time to go back and thicken them up. Trees are typically thickest in the middle, getting gradually thinner as the tree gets taller – a rule of thumb for both the trunk and the side branches.

The 2″ brush was handy for adding girth to the trees, while the thin artist brush kept the edge lines clean and the branch ends nice and light
I added in a few leaves here and there after the trees were complete. I intended to add a couple birds, as I did for her old mural, but I’m waiting on that step. There’s something really serene to me about the simple way they are drawn now, so I might just leave them as is.

The final mural for Juniper’s new room. Each tree is unique and imperfect – just like in nature.
I am no fine artist, but choosing a simple design and taking it slow produced a mural I am really proud of. If you have been thinking about a mural in your home, hopefully this builds some confidence that you can do something similar!

 I start with a
 There's a go