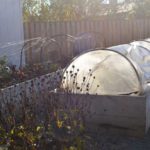
 The solution I have come up with is to rig plastic hoops over the beds, secured in place with rebar. Bird netting is fixed to them in the spring, summer and fall. Clear plastic is fixed to them in winter, to create mini greenhouses over each raised bed. The process is super simple and the materials are cheap-cheap-cheap.

Rebar hammered into place inside the corner of the raised bed
First, I used three foot thin rebar and hammered them into place on the inside of the raised beds – six total per 4′ x 6′ bed. Hammer one in each corner, then one about halfway down the length of the bed on either side. Mine are hammered down so only about 4-6″ is visible above the soil line. You can’t see them unless you look closely inside the bed.
Placing scrap irrigation pipes over the rebar on either side of the beds, making a hoop
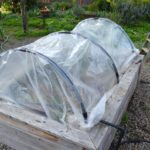
Next, I used some salvaged irrigation pvc piping to create the hoops. I placed either end over the exposed rebar, creating a hoop over the 4′ width of the beds. I did this three times per bed.

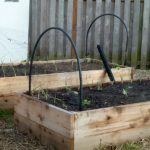
Rebar in place securing irrigation pipes, creating hoops over the beds
The final step is attaching bird netting to the hoops. I tie mine in place with whatever is handy: garden twine, twist ties from bread bags, etc. Make sure it is nice and taut, securing the ends of the beds as well so no critters can crawl in any openings.

Hoops in place, ready for bird netting/greenhouse plastic
If you are using greenhouse plastic or contractor plastic, you can clip them onto the hoops without puncturing the plastic. Just cut some smaller pieces of plastic irrigation, maybe 2-3″ in length. Then cut them in half lengthwise, cutting out about 1/4″ strip. Place the plastic over the hoop, then use the cut piece of plastic to place over the top. It should clap on to the hoop below, holding the plastic in place. It’s basically a DIY version of clamps you could otherwise buy.
Cut a small section of irrigation pipe, about two inches. Then cut about 1/4″ strip lengthwise.
I leave the bird netting all year, so the chickens can free-range without causing too much destruction. The plastic I place on top of the bird netting. That means the hoops are there year round providing protection to all my vegetable goodies growing in the raised beds. How easy is that?

 This cluster was about the siz


 I start with a


Yay! Thanks for the how to. Looks perfect and simple to do.
This is great! How long were the pieces of black pipe?
They are probably about six feet in length. Glad you like the idea!
Hey there. looks good. I’ve seen that done with white PVC and, utility aside, they looks tacky. The black PVC, to the contrary, looks rather suave. Dare I say sleek? I’m not sure if they’d work for you, but I’ve been using snap clamps on my low tunnel and they work great. Buy them at Johnny’s Select Seeds.
Great idea for the urban setting! I was wondering what to do as we head back into the growing season now that our chicken girls are quite used to free ranging the garden… Thanks!
looks great. What is the diameter of the black irrigation pipe you used? Would like to source it. Ideas?
The pvc pipes are about 7-8′ in length. Hope that helps.
I love the black pipe. We used PVC too, and it’s not as pretty. We found two dead black racers in our bird netting, so we switched to chicken wire. Do you remove the netting and replace it every time you need to get to the garden?
Carol, I just peel back the bird netting from the edge of the beds when I need to work inside them, but leave them clamped to the pipes if I can. Then just move them back into place when I’m done. It seems to work well for us!
Now I’m wondering what type of screen I could used instead of the bird netting? The bird netting is easy to move around, but it kills black racers. Hmmmm? Those squirrels are such a pain!
They make that landscape cloth stuff that I’ve draped over my swiss chard before to protect it from leaf miner. It looks cotton-ish and it’s white. It still lets in enough light to let the chard grow and I wonder how it would do over other crops. You could always try that for crops that don’t need pollination as an experiment. Let me know if you find a solution!
Hi, I was wondering what you used and how you built the actual raised beds? What kind of wood did you use? Thanks! Love the idea, I’m getting ready for spring and am going to build one!
Hi Megan – these raised beds were a kit from NaturalYards, a local family-owned Oregon company. They are made with sustainably harvested cedar. You can find out more about their assembly from their website here: NaturalYards.com
I am trying winter gardening in raised beds for the first time this year. I am a complete novice. I want to save money on grocery bills for my struggling family and am willing to work hard to make this work. If I do the hoops, and i pull them back to water, doesn’t that let cold air in? How do I avoid that, or will the air warm back up? Should I get a heater to put in them? As I said, total novice, obviously. I will take any suggestions, websites, direction I can get…Thanks!
Sarah, these are great questions. Don’t put a heater in there – it will melt the plastic and might electrocute you with moisture around! The greenhouse plastic will keep the beds warmer day and night, but the biggest temperature threat is overnight/very early morning (like 5-6 am) when it gets coldest and tender plants would croak. Pulling the plastic back during the day will let some warm air escape, but it will have time to rewarm before nightfall. I advise you to pick winter-specific varieties of vegetables, to give you the greatest chance of all-season gardening success. Some winter crops will overwinter by just hanging on/not dying, rather than putting on a lot of growth or producing much of a harvest. You might chat with your local nursery to get their advice on which crops you can get a good harvest from over the winter in your area, vs. which crops will just overwinter/not die. Make sense?
Can you just water the plants without removing the netting?
Yes! You can water without removing the nets.