Hip Chick Digs

Adventures of an urban homesteader growing greens, preserving the harvest and tending a backyard barnyard

 Facebook Twitter LinkedIn Instagram Pinterest
  • Home
  • About
  • Blog
  • Homestead Tour
    • Current Homestead
    • Original Homestead
  • Landscape Design
  • Book
  • Archives

May 10, 2012 by: Renee Wilkinson

Planting Potatoes: The Double Dig Method

Share
Share on Google Plus
Share
Share on Facebook
Share
Share this
Pin
Pin this

St Patrick’s Day is usually my cue that potatoes need to be planted. You can still get your spuds in and have a decent harvest, but it needs to happen soon! Potatoes can be easily grown in something as simple as a bucket full of soil with drainage holes in the bottom. Although they are adaptable to lots of growing methods, the double-dig method has given me the highest yields.

The method works by first digging a nice, long trench. Keep the soil you dig out somewhere handy, as you will need it later in the season to mound up your spuds. The second step is to dig  a second, deeper trench in the one you have just cleared out. Don’t remove the soil in this deeper trench though. Instead you are just loosening the soil to give the potatoes an easy place to grow and multiply in the soil.

Plant your spuds in this loosened soil anywhere from 1-2 feet apart. You can use seed potatoes from a garden store or grocery store-bought spuds. The seed potatoes will likely be well adapted to your climate and free of disease. These days I often use organic potatoes from my local market. They are grown nearby, so I know they will do well in my climate. Because they are organic, they should not have been sprayed with an anti-rooting agent.

What’s an anti-rooting agent? Surely you have grabbed a potato from the sack to cook and found it sprouting. Annoying, right? Non-organic farms will often spray potatoes with an anti-rooting agent to slow down the sprouting.

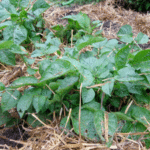
As the potato greens grow, use the soil you removed to mound the trench little by little. Just leave at least 4 inches of greens showing. If you are battling weeds, you can dress the top lightly in mulch. Just don’t overdue it – you want the potatoes growing in soil, not mulch.

Around late summer or early fall, the greens will begin to die. That is your cue that the potatoes have multiplied as much as they will that season. Harvest them all at once or do what we do and just dig out what you need as you need them. We haven’t had issues with any going mushy on us since our soil drains well.

The other methods I have tried include growing potatoes in chicken wire (not a great yield), straw (mushy and some rotten spuds), and even recycled tires (great yield, but ugly in the garden and potential leeching issues). After several years of experimentation, the double-dig method has given me the best results. What has been working for your potato patch? Are your spuds already in the ground?

Related Posts

  • Early Spring Outside PlantingEarly Spring Outside Planting
  • The Case for Boring VegetablesThe Case for Boring Vegetables
  • 2016 Vegetable Garden Plan2016 Vegetable Garden Plan
  • 2016 Seed Order2016 Seed Order
Egg Recipe: Garden Fritatta
Propagating Grapevines

Comments

  1. 1

    Tracy Falbe says

    May 11, 2012 at 2:56 pm

    Although I till soil as little as possible I do make an exception for potatoes. I also dig the trench and loosen the soil in the bottom of the trench and hill soil around the potatoes as they grow as you described. Works very well.

  2. 2

    Hector Grant says

    July 13, 2012 at 3:08 pm

    Hi Tracey:
    My best potato yields were from my gardens in Kansas City, Missouri.
    I adapted the Ruth Stout Method of lazy gardening. I commuted to Texas
    where I bought seed potatoes in January while it was still snowing on the ground in KCMO. On a sunny day, in late january or early February,
    I spread cow munure on the frozen ground,laid out the whole small potates or cut nd cured potto pieces in the sevral rows, then covered
    the whole area under a foot or more of old hay. I didn’t worry when more snow covred the lot. The spuds remained safe and warm under the hay blanket. Some time after Easter, the first green leaves would appear. One month aftwer that, there would be blossoms, and in another month the leaves would begin to turn yellow. I could then grub around for early potatoes. I began reaping whopping red or white potteoes as needed, and depending on how much I gave away, I’d have potates well into the fall.

Trackbacks

  1. Early Spring Outside Planting | Hip Chick Digs says:
    March 27, 2015 at 10:49 am

    […] used the Double-Dig Method to plant the potatoes – where you basically dig a trench, remove the soil, then dig again and […]

  2. Mid-Spring Garden | Hip Chick Digs says:
    April 17, 2015 at 11:10 am

    […] the trenches with more soil. In general, I let about 4″ of green stay above ground. This double-dig method should yield a bigger harvest, as burying more of the greens will encourage the plants to produce […]

Leave a Reply

Your email address will not be published. Required fields are marked *


Instagram

Most days on the homestead aren’t big or dramati Most days on the homestead aren’t big or dramatic—they’re made of small, steady moments.

Refilling the chicken feeder. Collecting eggs still warm from the nest. Pulling up a few carrots. Tossing weeds to the flock. Trimming back the roses before they take over.

It’s not about doing it all—it’s about doing what you can, when you can.
Modern homesteading is less about perfection and more about rhythm. A little work, a little joy, and a lot of dirt under your nails.

Homesteading looks different for everyone—what does it look like (or feel like) for you?

#hipchickdigs #modernhomesteading #dayinthelife #backyardchickens #gardeninglife #homesteadrhythms #growyourown
Swarm catching 🐝 This cluster was about the siz Swarm catching 🐝 This cluster was about the size of a basketball hanging in a Doug Fir next to a playground. They were super easy to catch with my extension pole! 

Note: don't put a swarm in anything plastic. I hated putting them in this bucket, but it's all I could grab in time. But they can easily overheat in something like this, which lacks good ventilation. I relocated them into a wooden hive super quick, but I was so nervous every minute they were in here.

As always, I chatted with several onlookers. Folks are always so curious about swarms and honeybees. It's a lovely way to educate and build bee ambassadors 🐝 
.
.
.
#urbanbeekeeping #swarm #beeswarm #swarmseason #womeninbeekeeping #beekeeperslife
Weekend vibes: gardening in pajamas, coffee in han Weekend vibes: gardening in pajamas, coffee in hand, and dirt under my nails before 9am.
This is how I fit homesteading into modern family life—little pockets of peace squeezed between breakfast and soccer games.

It’s not picture-perfect, but it’s real—and it feeds my soul (and my soil). Here’s to slow starts, messy mornings, and growing what we can, when we can.

How do you squeeze in garden time during busy weeks? Pajamas optional—tips welcome.

#hipchickdigs #weekendgardening #momlifeinthegarden #homesteadinglife #gardeninginreallife #slowmorningvibes #growyourown
Hey there, new friends! I’m Renee, a modern home Hey there, new friends! I’m Renee, a modern homesteader living in Portland, Oregon—raising chickens, veggies, and three awesome kids on our little slice of urban heaven.

I'm carrying on generations of knowledge to grow my own food, live more sustainably, and teach my family the value of getting our hands dirty (in the best way). Here, I share the real ups and downs of homesteading—think garden wins, chicken shenanigans, DIY projects, and everyday lessons from the land.

Fun fact: I'm a tango dancer and a landscape architect. Both are useful in the garden 💃🏽 

I’d love to get to know you—drop a comment and tell me where you’re from and what you’re growing (plants, dreams, chickens… anything counts)!

#homesteadlife #urbanhomestead #gardentok #backyardfarm #intro
Homegrown asparagus tastes 1,000% better than anyt Homegrown asparagus tastes 1,000% better than anything from the store. So juicy, crisp, naturally sweet. Some of these were 18" long and still tender. 

Asparagus is a perennial vegetable, meaning you plant once and it comes back every year. You have to wait until year three to start harvesting, but it's worth that wait. 

I do nothing to care for it, but every year I have arms full throughout spring and early summer. I planted an 8' row along an otherwise boring fence. The foliage turns brilliant gold in the fall. Tell me if you grow this crop! 
.
.
.
#modernhomestead #pdxgarden #urbanhomestead #urbanfoodforest #foodscape #foodforest #asparagus #growingasparagus #springgarden #springharvest
More garden arches! This one also started with 20' More garden arches! This one also started with 20' lengths of thin rebar, shoved into the ground with my weight and hooped over loosely. Our old Christmas tree trunks are tied to the rebar, to thicken up the base. 

Pruned branches from our fig tree make good vertical supports. Multi-stemmed branches help build up the sides, bc they can also be woven in horizontally.

The most time is spent weaving in thin, flexible branches horizontally from our plum trees. The structure gets more secure pretty quickly, as tension is built up.

I use twine only selectively. Most is just held in place with just tension alone. It won't last forever, but it's not meant to. I'll rebuild in about 3-4 years as branches need replacing.
.
.
.
#modernhomestead #pdxgarden #urbanhomestead #foodscape #gardenart #gardenarch #timebasedart
Making woven garden arches 💪🏼 I start with a Making woven garden arches 💪🏼 I start with a few 20' lengths of thin rebar. My soil is soft at this time of year, so I can use my body weight to push them deep into the ground. 

Then I start layering in pruned fruit tree branches. Fig and pear work well as vertical sides. Plum and apple are flexible enough for me to weave in between. Multi-stemmed pieces are helpful to create tangles of branches. I use twine selectively, if at all. 

I dream of hopping across the pond to take a workshop at @damsonfarm.house to improve my technique making natural supports. Some day, I hope! 
.
.
.
#modernhomestead #pdxgarden #urbanhomestead #foodscape #gardenart #gardenarch #timebasedart
I couldn't bring myself to send these cushions to I couldn't bring myself to send these cushions to a landfill, even though the fabric covers were totally deteriorating. But I've never seen cushion covers for sale, until I stumbled upon these at Ikea.

They fit perfectly! I don't need fancy patio furniture - just a place to put my feet up. So hurray for the small wins and keeping these babies out of the landfill 🎉
.
.
.
#modernhomestead #patiofurniture #patiogoals #upcycle
Taking care of yourself can be a form of resistanc Taking care of yourself can be a form of resistance. Rest, nourish your body, tend your garden. Keep your tank full 💪🏼 
.
.
.
#modernhomestead #pdxgarden #urbanhomestead #urbanfoodforest #urbanfarming #foodscape
Follow on Instagram

RECENT PINS

HOUZZ

Hip Chick Digs Landscape Design Featured on Houzz

© 2025 · Fun Genesis WordPress Theme by, Pretty Darn Cute Design