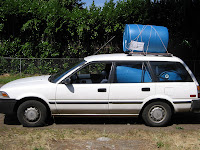
 Are you ready for your mind to be blown my friend? Get ready, cause here it comes. I built rain barrels! Actually I built four of them and it was so easy to do! I actually spent more time in the hardware store buying the supplies than I actually spent putting everything together. I would say it took about 30 minutes per barrel, plus the time it took to paint them.
Just to review what you probably already know, here are a few simple benefits of harvesting rain water:
- Saving money on your water bill by relying less on the city’s water supply, especially during those dry months when the garden needs it
- Conserving the earth’s resources (even if we don’t have a drought, clean water sources are limited)
- Reducing water runoff into the sewer system, which can overflow during rainy times. That’s gross to think of our sewer system backing up into the river. Need I say more?
- Protecting the foundation of your home, as many disconnected downspouts use a splash pan that deposits rainwater only a couple feet from your foundation. That’s not far enough away from the house to prevent damage over time
 Do some sleuthing before you begin to see if there is a food company that needs to get rid of some big 55-gallon (ish) barrels. The Yoshida’s operation near the PDX airport sells them for only $5. As long as they are “food safe”, that means they did not hold chemicals and will be safe to use. It’s always better to recycle something a company is done using than having to buy a new plastic barrel somewhere.
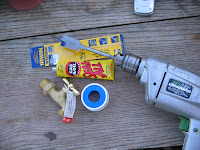
Here are the supplies you will need for each rain barrel:
- 55 gallon barrel
- one 3/4″ brass spigot
- one 3/4″ nipple
- plumbers tape
- plumbers goop/sealant glue
- 15/16″ drill bit (I actually didn’t get a full bit, but something that was good enough to drill through plastic)
- two cinder blocks
- gutter elbow or some other pipe that you can use to attach to gutter and direct water in barrel (mine is shown in the picture below in white)
Here are the steps I followed:
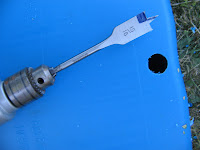
- Drill one hole about 2″ from the top of the barrel. This serves are runoff if the barrel gets too full.
- Wrap plumbers tape around 3/4″ metal nipple and squeeze some plumbers goop/sealant glue over threads. Twist into top hole – it will be very snug. Seal the outside with caulking if you want, just to make double sure it’s sealed tight.
- Drill one hole about 1-2″ from the bottom of the barrel. Wrap the 3/4″ brass spigot with plumbers tape and squeeze some glue onto it. Twist into place – it will be snug as well. Seal outside with caulking if you choose.
- Cut hole in top lid, if there is not one already (Yoshida barrels have one already). Size should allow the gutter elbow/redirecting pipe to easily pour water down into barrel without spillage.
- Place two cinder blocks under each barrel and cut gutter a little above the height of barrel. Allow a little room to add either a gutter elbow or some other pipe that you are going to use to direct water into barrel. Place some mesh over the opening of the gutter elbow/pipe and secure with a rubber band to prevent leaves and debris from running into barrel.
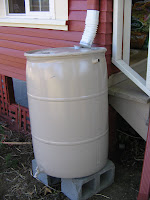 That’s it! We painted ours, so they blend in a little better to the foundation. I also attached a Y spigot to the barrels, so I can run a hose between each barrel, and use only one long hose from the last barrel. That way, when I use the water, I can pull from all four barrels instead of having to walk around and attach a hose to each individual barrel.
Good luck! It was so easy and so fast and I can’t wait to use the water on my plants!


 I start with a
 There's a go
Wow! That does sound easy. It’s been a vague goal of mine to have rain barrels in place by the beginning of this year’s rainy season….but so far I haven’t done anything to meet that goal, and I didn’t know how to do it. Thanks for the instructions!
–a fellow PDXBackyardChicken person
Hi there! We are finally getting 2 barrels tomorrow for our great Oregon rain. I have been wanting to do it for years and now it’s finally happening! What did you paint your barrels with? The ones we are getting are bright blue!
Have a great Spring!
Stephanie
NE PDX
Welcome Stephanie! Ours were bright blue originally as well. We happened to be getting the exterior of our home painted around the same time, so our painter used a sprayer thing to color them the same color as the foundation. Two years later, the paint has bubbled and peeled in some spots. Painting over plastic is just really hard, so I’m sure if a better method or paint exists?