Hip Chick Digs

Adventures of an urban homesteader growing greens, preserving the harvest and tending a backyard barnyard

 Facebook Twitter LinkedIn Instagram Pinterest
  • Home
  • About
  • Blog
  • Homestead Tour
    • Current Homestead
    • Original Homestead
  • Landscape Design
  • Book
  • Archives

January 18, 2009 by: Renee Wilkinson

Driveway Project Complete

Share
Share on Google Plus
Share
Share on Facebook
Share
Share this
Pin
Pin this

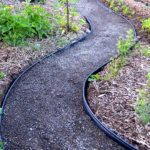
The driveway is done! This project would typically take about two weekends to build, but we had a snow storm roll through town and my grandfather passed away. Now that we have had a couple weeks to recover from those things, it took very little time to finish up the job.

My goal was to build a permeable driveway surface that would absorb rainwater, rather than have it wash down the street, into the drains, then flood our sewer system. The cost for the concrete pavers we used was very minimal – about $1 per 12″x12″ block, which are 2″ thick. Other materials, the sand and gravel, came in around $125. So for about $200 bucks, we have a lovely driveway that is a little more interesting than blacktop.

Digging out the driveway was the hardest part. Winter doesn’t allow much daylight and the temperature was quite cold when we were working. That took about one weekend to dig down roughly 9″ deep. The next phase was ordering a delivery of gravel and sand. After raking out a thick layer of gravel, we rented a compactor to compact everything down nice and tight. With the weight of a car eventually on top of all this, we wanted to make sure it wouldn’t sink over time.

Jay handled the compactor while I supervised. After that was complete, we made sure there was an even layer of about 6″ of gravel. We moved onto the sand, spreading about 2″ over the gravel surface. We then watered the sand, to let is seep into any remaining crevaces.

As Jay went off to return the rented compactor, I began laying out the pavers and leveling them. He was way more detail-oriented than I was, so he ended up having to re-level most of the ones I set out. All in all, if we didn’t have the weather interruption, the gravel/sand phase and laying out the pavers would have taken a weekend as well.

We have been parking our car on the new driveway for about a week, and everything still looks firm and level. If one cracks over time, it should be pretty easy to replace. My personal opinion is that it adds some interesting asethic to the front yard and we’re also being more eco-friendly by chosing a permable surface area. Thanks for all your positive feedback to reassue me the project would work out – it has and I love it!

Related Posts

  • Crushed Rock PathwaysCrushed Rock Pathways
  • Building Raised BedsBuilding Raised Beds
  • Garden Installation: Part IIIGarden Installation: Part III
  • Garden Installation: Part IIGarden Installation: Part II
American Victory Gardens in World War II
Onward

Comments

  1. 1

    gina says

    January 18, 2009 at 9:01 pm

    It looks great! Nice work! I considered trying to install my own paver patio last summer but chickened out and paid a dude to do it.

  2. 2

    Patrick says

    January 19, 2009 at 9:01 am

    Very nice work. It looks terrific.

  3. 3

    Katie says

    January 19, 2009 at 12:28 pm

    How lovely! I look forward to the day we can rip out our driveway and install pavers… It looks great!

  4. 4

    Daniel says

    January 19, 2009 at 10:02 pm

    Wow! Looks great. I know from experience keeping all the pavers straight is a challenge. Nice work.

  5. 5

    Brenna says

    January 26, 2009 at 4:07 pm

    Very cool! That looks like a project we might need to take on. Maybe sometime in the near future.

Leave a Reply

Your email address will not be published. Required fields are marked *


Instagram

Most days on the homestead aren’t big or dramati Most days on the homestead aren’t big or dramatic—they’re made of small, steady moments.

Refilling the chicken feeder. Collecting eggs still warm from the nest. Pulling up a few carrots. Tossing weeds to the flock. Trimming back the roses before they take over.

It’s not about doing it all—it’s about doing what you can, when you can.
Modern homesteading is less about perfection and more about rhythm. A little work, a little joy, and a lot of dirt under your nails.

Homesteading looks different for everyone—what does it look like (or feel like) for you?

#hipchickdigs #modernhomesteading #dayinthelife #backyardchickens #gardeninglife #homesteadrhythms #growyourown
Swarm catching 🐝 This cluster was about the siz Swarm catching 🐝 This cluster was about the size of a basketball hanging in a Doug Fir next to a playground. They were super easy to catch with my extension pole! 

Note: don't put a swarm in anything plastic. I hated putting them in this bucket, but it's all I could grab in time. But they can easily overheat in something like this, which lacks good ventilation. I relocated them into a wooden hive super quick, but I was so nervous every minute they were in here.

As always, I chatted with several onlookers. Folks are always so curious about swarms and honeybees. It's a lovely way to educate and build bee ambassadors 🐝 
.
.
.
#urbanbeekeeping #swarm #beeswarm #swarmseason #womeninbeekeeping #beekeeperslife
Weekend vibes: gardening in pajamas, coffee in han Weekend vibes: gardening in pajamas, coffee in hand, and dirt under my nails before 9am.
This is how I fit homesteading into modern family life—little pockets of peace squeezed between breakfast and soccer games.

It’s not picture-perfect, but it’s real—and it feeds my soul (and my soil). Here’s to slow starts, messy mornings, and growing what we can, when we can.

How do you squeeze in garden time during busy weeks? Pajamas optional—tips welcome.

#hipchickdigs #weekendgardening #momlifeinthegarden #homesteadinglife #gardeninginreallife #slowmorningvibes #growyourown
Hey there, new friends! I’m Renee, a modern home Hey there, new friends! I’m Renee, a modern homesteader living in Portland, Oregon—raising chickens, veggies, and three awesome kids on our little slice of urban heaven.

I'm carrying on generations of knowledge to grow my own food, live more sustainably, and teach my family the value of getting our hands dirty (in the best way). Here, I share the real ups and downs of homesteading—think garden wins, chicken shenanigans, DIY projects, and everyday lessons from the land.

Fun fact: I'm a tango dancer and a landscape architect. Both are useful in the garden 💃🏽 

I’d love to get to know you—drop a comment and tell me where you’re from and what you’re growing (plants, dreams, chickens… anything counts)!

#homesteadlife #urbanhomestead #gardentok #backyardfarm #intro
Homegrown asparagus tastes 1,000% better than anyt Homegrown asparagus tastes 1,000% better than anything from the store. So juicy, crisp, naturally sweet. Some of these were 18" long and still tender. 

Asparagus is a perennial vegetable, meaning you plant once and it comes back every year. You have to wait until year three to start harvesting, but it's worth that wait. 

I do nothing to care for it, but every year I have arms full throughout spring and early summer. I planted an 8' row along an otherwise boring fence. The foliage turns brilliant gold in the fall. Tell me if you grow this crop! 
.
.
.
#modernhomestead #pdxgarden #urbanhomestead #urbanfoodforest #foodscape #foodforest #asparagus #growingasparagus #springgarden #springharvest
More garden arches! This one also started with 20' More garden arches! This one also started with 20' lengths of thin rebar, shoved into the ground with my weight and hooped over loosely. Our old Christmas tree trunks are tied to the rebar, to thicken up the base. 

Pruned branches from our fig tree make good vertical supports. Multi-stemmed branches help build up the sides, bc they can also be woven in horizontally.

The most time is spent weaving in thin, flexible branches horizontally from our plum trees. The structure gets more secure pretty quickly, as tension is built up.

I use twine only selectively. Most is just held in place with just tension alone. It won't last forever, but it's not meant to. I'll rebuild in about 3-4 years as branches need replacing.
.
.
.
#modernhomestead #pdxgarden #urbanhomestead #foodscape #gardenart #gardenarch #timebasedart
Making woven garden arches 💪🏼 I start with a Making woven garden arches 💪🏼 I start with a few 20' lengths of thin rebar. My soil is soft at this time of year, so I can use my body weight to push them deep into the ground. 

Then I start layering in pruned fruit tree branches. Fig and pear work well as vertical sides. Plum and apple are flexible enough for me to weave in between. Multi-stemmed pieces are helpful to create tangles of branches. I use twine selectively, if at all. 

I dream of hopping across the pond to take a workshop at @damsonfarm.house to improve my technique making natural supports. Some day, I hope! 
.
.
.
#modernhomestead #pdxgarden #urbanhomestead #foodscape #gardenart #gardenarch #timebasedart
I couldn't bring myself to send these cushions to I couldn't bring myself to send these cushions to a landfill, even though the fabric covers were totally deteriorating. But I've never seen cushion covers for sale, until I stumbled upon these at Ikea.

They fit perfectly! I don't need fancy patio furniture - just a place to put my feet up. So hurray for the small wins and keeping these babies out of the landfill 🎉
.
.
.
#modernhomestead #patiofurniture #patiogoals #upcycle
Taking care of yourself can be a form of resistanc Taking care of yourself can be a form of resistance. Rest, nourish your body, tend your garden. Keep your tank full 💪🏼 
.
.
.
#modernhomestead #pdxgarden #urbanhomestead #urbanfoodforest #urbanfarming #foodscape
Follow on Instagram

RECENT PINS

HOUZZ

Hip Chick Digs Landscape Design Featured on Houzz

© 2025 · Fun Genesis WordPress Theme by, Pretty Darn Cute Design